Associate Audio File

Written by Justin Sieger
Updated at May 30th, 2024
Associate Audio File is an Edit feature that can be used to associate audio to a transcript after the transcript has been created. The Associate Audio File feature is available for use with Direct Audio (.sgmca) files and can support non-CATalyst specific audio formats. If you have an audio file that was not recorded using CATalyst, for example, an MP3, M4A, MP4, that you’d like to associate to an existing transcript, you can use the Associate Audio File feature.
NOTE: Associating MP3, MP4, and M4A files require CATalyst version 22 or higher. If you're on CATalyst version 21 or lower, you will need to convert the MP3 file to WAV format and then associate the audio file. You can read about how to convert MP3 files in our article here.
Associate a Single Channel (.wav or .opus) or Direct Audio (.sgmca) File
-
Click Tools, Audio, Associate Audio File (Alt + t, a, f). The Choose Audio File dialog box displays.
NOTE: If you select to associate audio with a file that already has an audio file associated with it, CATalyst displays the message: The file jobname.wav is already associated with this transcript. Are you sure you want to associate a new audio file with this transcript? Select Yes to associate the new audio or No to cancel and retain the audio already associated with the file.
-
To select between wav/opus and sgmca files, click the drop down next to Files of.
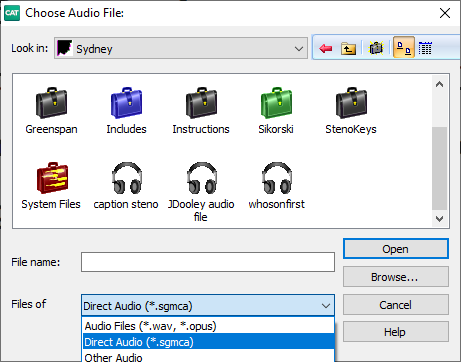
Select the wav, opus, or sgmca file you want to associate and click Open.
-
At the Was this audio file recorded using Case CATalyst prompt, do one of the following:
If the audio was simultaneously recorded in CATalyst with the current transcript, before using the Associate Audio feature, you may want to make sure the audio file has the same name as the transcript and is located in the same folder. Then, just click Play Audio and the audio should play without using the Associate Audio file. If that solution does not work for you, you can use the Associate Audio command and select Yes at the prompt.
Select No if the audio recording is from a source other than CATalyst. After the audio file has been associated, you may use EZ Sync at Cursor or EZ Sync to adjust the synchronization if necessary.
Associate a non-CATalyst Audio File Format
Associating a non-CATalyst audio file to a transcript can be useful if you have an audio recording for the transcript that was recorded from some other source than CATalyst and you'd like to associate that audio file to the transcript. A non-CATalyst audio file format can be a Multi Channel or Single Channel audio file that was not recorded using CATalyst.
The following audio file formats may be associated to a CATalyst transcript: WAV, MP3, MP4, OGG, OPUS, M4A, WMA, AVI, MKV, MOV, MPG, MPEG, WEBM.
When a non-CATalyst audio file is associated to a transcript, the number of audio channels available in the source audio file is preserved and available as individual audio channels for playback in CATalyst.
Select Tools, Audio, Associate Audio File (Alt + t,a,f). The Choose Audio file dialog displays.
-
Select the drop down selector for the "Files of" field, then select Other Audio (*.sgmca).
Select the non-CATalyst audio file you'd like to associate and press Enter (Open).
If a Direct Audio (*.sgmca) file already exists in the same location and with the same name as the current transcript, you will be prompted to supply a new file name. After supplying a new file name or if a new name was not needed, an Importing Audio dialog will appear. It is during this time that the source audio file is being imported and converted to a Direct Audio (*.sgmca) format. The amount of time it takes for the Importing Audio dialog to finish and close will depend on the size of the size and number of channels of the source audio file. When it is finished, the Importing Audio dialog will close. The original source audio will not be changed.
After the audio file is associated, you may use EZ Sync at Cursor or EZ Sync to adjust the synchronization if necessary.