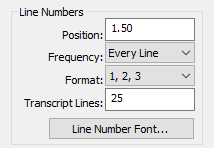
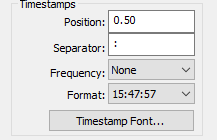
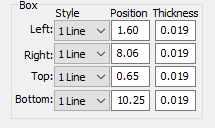
The Page Setup pane in Layout allows you to set formatting values that affect the way the text displays on the printed page. These settings include line numbers, top and bottom margins, timestamps, and transcript box style. You can modify the Page Setup while in a job, using the Modify Job Layout feature.
Page Setup Values
Make entries in the fields and then click Apply to view the changes. Measured values are in inches or centimeters depending on your Current Display Measurements setting. To save the changes to the layout, press Ctrl +s.
Line Numbers

-
Position
This is the horizontal position of the line numbers on the page. The position of line numbers is a measurement taken from the left edge of the paper in inches or centimeters, depending on your setting. A typical position setting for 8 ½ x 11 inch paper is between .75 and 1.25 inches.
If you are printing a box, the line numbers are usually to the left of the box. When line numbers are left of the box, the value entered here must be less than the number entered in the Left Position field for the Box.
-
Frequency
Determines how often line numbers appear on the page with Every Ling being the most common. You can chose None, Every Line, Every 5th or 10th Line, or First Line Only
-
Format
Determines the type of line number format with 1, 2, 3 being the most common. You can chose between numbers, upper and lower case letters, or upper and lower case Roman numerals.
-
Transcript Lines
Type the number of transcript lines to determine how many lines of transcript print on each page. This setting is usually between 24 and 28 lines.
The placement of the first transcript line is determined by the top margin. The amount of space between each transcript line is determined by the number of transcript lines and the top and bottom margins.
-
Line Number Font
Set the font, font style, size and effect for the line numbers.
Paper Size and Margins

-
Paper Size
Each paper size has preset width and height values. To use a paper size not listed, select Other and set the width and height values. Select one of the following paper sizes:
Letter - 8 ½ x 11 inch paper is commonly used for transcripts.
Legal - 8 ½ x 14 inch paper is commonly considered legal size.
A4 - A metric measurement usually used in the United Kingdom and Australia.
Other - Used for custom width and height values.
-
Width
The width of the selected paper size. These are preset values for all the paper sizes, except Other. When selecting Other, you must set a Width and Height value.
-
Height
The height of the selected paper size. These are preset values for all the paper sizes, except Other. When selecting Other, you must set a Width and Height value.
-
Top Margin
The distance from the top of the page the first transcript line prints. The position is a measurement taken from the top edge of the paper in inches or centimeters, depending on your setting. It is typed in decimals. A typical value for 8 ½ by 11 inch paper is 1.0 inch. To change the value, type a new number.
The vertical placement of the first transcript line is determined by the top margin. The amount of space between each transcript line is determined by the number of transcript lines and the top and bottom margins.
-
Bottom Margin
This setting determines how far down from the top of the page the last transcript line prints. The position is a measurement taken from the top edge of the paper in inches or centimeters, depending on your setting. It is typed in decimals. A typical value for 8 ½ by 11 inch paper is 10.0 inches. To change the value, type a new number.
The vertical placement of the first transcript line is determined by the top margin. The amount of space between each transcript line is determined by the number of transcript lines and the top and bottom margins.
Use Characters Per Inch/Centimeters

Check this box to specify the number of characters that print in one inch/centimeter. Enter a value in the Characters Per Inch/cm field. Stenograph strongly recommends you use a fixed (mono) spaced font when using this option. The following fixed space fonts are available:
Provided by Stenograph - Arial Monospaced, Andale Mono and Letter Gothic
Provided by Windows - Courier New
If you checked the Use Characters Per Inch/Centimeters box, you must enter a value to determine the number of characters per inch/cm. The lower the number, the more space between each character and the fewer characters on a line. The higher the number, the less space between each character and the more characters on a line. Usually this setting in inches is 9.00 or 10.00. To change the numbers of characters per inch/cm, type the new number.
A quick way to determine the characters per inch. Use a ruler to determine the number of characters that display in an inch. Let's say you are using a standard letter size page (8.5 x 11). You set your left margin at 1.25 and your right margin at 1.0. Since your page measures 8.5 inches that means you have 6.25 inches available for you lines of text. If you set your characters per inch to 9, you'll have space for 56 characters per line. If you set your characters per inch to 10, you'll have space for 62 characters per line.
This field is only available when you select the Use Characters Per Inch/Centimeters option.
If your layout or agency's layout has a characters per line requirement, you can use the Characters Per Line Assistant feature.
DeleteTimestamps

Timestamps are automatically generated when writing realtime. You can specify whether they print or not and whether they print on the far right or left edge of the page. To print timestamps for every job, select a setting in the Frequency field. When printing a job, the Print Options allow you to select or deselect timestamps. Timestamp settings must be set in the layout in order to print timestamps.
-
Position
Determine the horizontal position of the timestamps on the page. To change the setting, type a number in the field. The position of the timestamp is a measurement taken from the left edge of the paper in inches or centimeters, depending on your setting. It is typed in decimals. When you print timestamps on the far left side, a typical setting for 8 ½ by 11 inch paper is between .30 and .50 inches. If you print timestamps on the far right side, a typical setting is between 7.30 and 7.80 inches.
-
Separator
The symbol that separates the hours, minutes and seconds. To change the symbol, type a new symbol. The most common symbol used is the : (colon).
-
Frequency
Determine how often timestamps are printed. The most common setting is to print numbers on every line. Select the frequency: None Every line Every 5th Line Every 10th Line
-
Format
The format for the timestamps display. Select an option: 3:47PM (12-hour with AM/PM), 3:47 (12-hour), 15:47 (24 hour), 5:47:57PM (12-hour with seconds and AM/PM), 5:47:57 (12-hour with seconds), 15:47:57 (24-hour with seconds)
-
Timestamp Font
Set the font, font style, size, and effect for the timestamps. A typical setting for font size is between 8 and 10. Select Timestamp Font to display the Font dialog box.
Box

The Box refers to the border that is sometimes printed around the transcript text. You can choose to not print a box or only print a particular side of the box.
-
Style
The Style field refers to the type of line. Select a line type for each of the box sides: Left, Right, Top, and Bottom. You can select None, 1 line, or 2 Lines.
-
Position
This setting determines where the box line prints on the page. Type a number for the position of any box lines you are using: Left, Right, Top, and Bottom. If you are not printing a box, no entry is necessary. If you are only printing one of the box lines, only that particular line is required. Type a number for each box line:
-
Left
This setting is for the box line on the left side of the page. It is measured from the left edge of paper in inches or centimeters, depending on your setting and typed in decimals. Make sure this value is less than the value of a Left Margin field in paragraph styles. A typical setting for 8 ½ x 11 inch paper is between .80 and 1.40 inches.
-
Right
This setting is for the box line on the right side of the page. It is measured from the left edge of paper in inches or centimeters, depending on your setting and typed in decimals. Make sure this value is more than the value of a Right Margin field in paragraph styles. A typical setting for 8 ½ x 11 inch paper is between 7.20 and 8.15 inches.
-
Top
This setting is for the box line on the top of the page. It is measured from the top edge of paper in inches or centimeters, depending on your setting and typed in decimals. A typical setting for 8 ½ x 11 inch paper is between .30 and .80 inches.
-
Bottom
This setting is for the box line on the bottom of the page. It is measured from the top edge of paper in inches or centimeters, depending on your setting and typed in decimals. It is usually placed ¼ inch below the last transcript line. A typical setting for 8 ½ x 11 inch paper is between 10.00 and 10.80 inches.
-
-
Thickness
This setting determines how thick the box line prints. The higher the number, the thicker the box line. Type a number for each of the box lines: Left, Right, Top, and Bottom. If you are not using a box, no entry is required.