Check It is a CATalyst Edit feature where the audio associated to the transcript is sent to the Phoenix ASR engine. Phoenix, behind the scenes, compares the CATalyst transcript text with what it heard from the audio file and provides suggestions where there is a mismatch. The Check It suggestions will be displayed in the Check It Pane and can be visible as underlined words and phrases in the transcript text.
Once Check It has the transcript from Phoenix, the information Check It needs to create suggestions will be available. There is no need to rerun Check It for a job that already has Check It information. Check It will automatically update the suggestions offered as you edit the transcript.
Numbers are ignored by Check It and there will be no suggestions generated for numbers.
Check It is an optional add-on to CATalyst. To use Check It you must be on CATalyst 21.66 or better and have an internet connection. You will need to run the CATalyst Updater to get to the new version. For more information, please contact our Sales Team at 1-800-323-4247 and say “Sales”.
NOTE: Check It is NOT a tool for generating a transcript from an audio recording and Check It will NOT make changes to a transcript without direct action from the user. The complete text produced by the Phoenix engine will not be available in any way to the user other than suggestions highlighted through the transcript generated from steno.
Running Check It on a file in Edit
While in a file click on Tools, Run Check It, click the Check It icon  in the Edit toolbar, or if you have the Check It pane open, click the Check It icon.
The Check It icon will change colors to provide you with information on the Check It status of the transcript. Each status color has an accompanying mouse hover tooltip text for additional information. The Check It pane will show the text information that accompanies each icon status.
Check It Icon Colors
Light Blue – Run Check It.
Orange – Audio file converting, please wait. and Audio file uploading, xx% completed.
Dark Blue – Upload completed, please allow a few minutes for Check It suggestions to be ready.
Red – An error occurred, please run Check It again.
Green – Check It suggestions ready.
Note: After starting Check It, and prior to the Check It analysis finishing, you can cancel Check It by clicking Run Check It again. However, we do not recommend this since it takes only a few minutes to finish running Check It.
Scanning for Check It Suggestions in the Transcript
The Scan command (F8) is an easy way to navigate to Check It suggestions in the Transcript. You can modify your scan options to stop on Check It suggestions and also select whether the Check It dialog opens automatically when scanning. To do this while in Edit click Tools, Options, Scan For (Alt-t, o, c) and check the boxes next to Check It and Check It dialog.
If you place a check on Check It suggestions but not Check It dialog, the Check It dialog box will not display when you scan to a Check It suggestion. You can, however, either click Global, Check It or assign the Check It keyboard command to a key of your choice.
Scan For and Scan Backward For Check It
If you want to specifically scan for Check It suggestions in the transcript, try using the Scan For and the Scan Backwards For options.
To scan forward for Check It suggestions click Special Edit, Scan For, Check It (Alt-s, c, t). To scan backward for Check It suggestions click Special Edit, Scan Backward For (Alt-s, k, t).
Viewing the Check It Pane
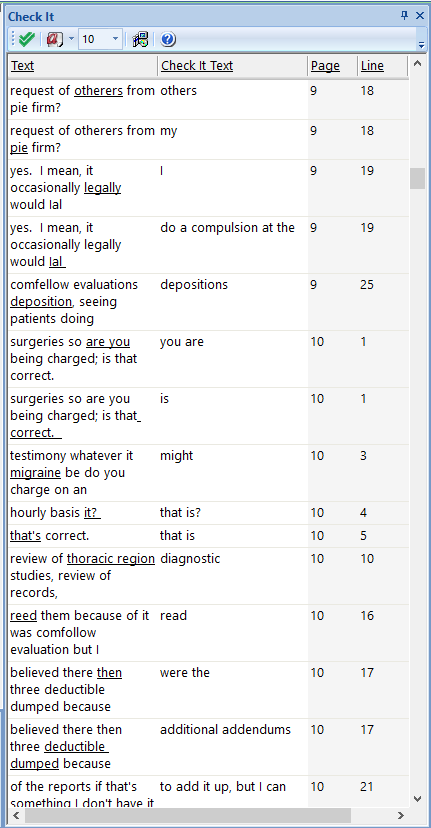
The Check It Pane allows you to see all Check It related information in one place. This includes the line of context from the CATalyst Transcript and the Check It suggestion for the underlined word or phrase.
To view the Check It pane click View, Panes, Check It (Alt + v, e, i).

When Check It is analyzing the audio file, the Check It Pane will display the text Check It is analyzing transcript. The time it takes for the transcript to be analyzed will depend on the length of the audio file. When complete, the Check It pane will begin populating with the Check It suggestions.
Acting on a Check It Pane entry
You may take action on an entry in the Check It pane by double clicking on the entry or right clicking on the entry. Alternatively, you can also assign a keyboard map per your choice.
When you double click an entry, the Check It dialog will display. By default, your cursor will move to that location in the transcript and an audio snippet will play for the text of that Check It pane entry. You may then take one of the actions listed in the Check It dialog.
When you right click an entry, a menu will appear. You may then take one of the actions listed on the menu.

If you assign a key to your keyboard map, press the key to open the dialog box. This is very handy when you are not using the pane and using F8 to scan during editing.
Check It Dialog Box Options
When the Check It dialog box opens, you will see several options available.
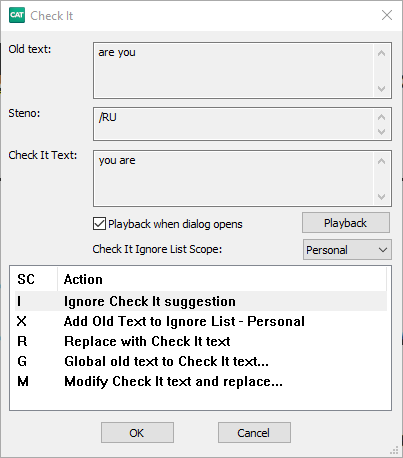
At the top of the dialog is the Old Text, Steno, and Check It text boxes. The Old Text displays the transcript text while the Steno displayed the associated steno. The Check It Text shows what Phoenix “heard” when it was analyzing the audio file. Depending on how you have set your Check It options, a suggestion may not have text in the Old Text and Steno boxes.
The Playback when dialog opens check box is checked by default. Uncheck the box if you would not like the audio to play when the dialog box opens.
The Playback button will play a few seconds of audio before and after the suggestion to give context to what was said.
The Check It Ignore List Scope: drop down box, allows you to choose which Check It Ignore List, the Old Text will go if you choose the Add Old text to Ignore List option.
The SC/Action box is a list of choices on how you would like Check It to handle the suggestion. You can either double click on the choice you want, highlight the choice and click OK, or press the appropriate keyboard shortcut.
NOTE: Depending on the type of Check It suggestion, not all choices will be available. Also the keyboard shortcuts cannot be changed.
Ignore Check It suggestion (I) - This will remove the suggestion from the Check It pane as well as remove the underline from the transcript.
Add Old text to Ignore List (X) - Will add the Old Text to the Ignore List that is selected in the Check It Ignore List Scope drop down menu. It will also remove the suggestion from the Check It pane and remove the underline from the transcript.
Replace with Check It text (R) - Removes the Old Text from the Transcript and puts the Check It text in it's place. It will also remove the suggestion from the Check It pane and remove the underline from the transcript.
Global old text to Check It text (G) - Displays a Global dialog box to add the entry to a dictionary.
Modify Check It text and replace… (M) - Displays a Modify Check It text dialog where you can change the Check It text.
Add Check It text (A) - Adds the Check It text to the transcript but does not remove the Old Text.
Navigating Check It Data in the Transcript Text
Check It information, by default, adds underlines to words and phrases in your transcript. This provides visual information that Check It found a difference between your transcript text and the transcript created by Phoenix. You can use Scan (F8) to move your cursor to the Check It locations in the transcript in addition to or as an alternative to using the Check It pane.
Check It Options
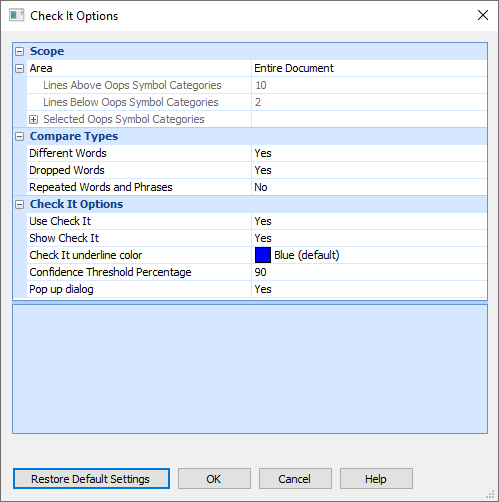
The Check It Options dialog gives you the ability to customize some aspects of how Check It displays information. To open the Check It Options dialog, click Tools, Options, Check It or click the Options icon inside the Check It pane.

Scope
Area:
Entire Document - Suggestions will be displayed for the entire document.
Around All Oops Symbol Categories - Suggestions will only be displayed around Oops format symbols. You can set how many lines before and after the Oops symbol you would like to see Check It suggestions.
Around Selected Oops Symbol Categories - Suggestions will be displayed only in proximity to the Oops Symbol Categories you specify instead of the Entire Document or Around All Oops Symbol Categories.
Selected Oops Symbol Categories - If Around Selected Oops Symbol Categories is selected as the Area setting, you may select Yes (default) or No for each of the Oops 0 – 10 Categories. Check It will only offer suggestions in proximity to Oops Categories that are set to Yes. The Check It Options dialog will also display any custom category text you have given to an Oops Category in the Hotspots Pane Options.
Lines Above Oops Symbol is default set to 10
Lines Below Oops Symbol is default set to 2
Compare Types
Different Words - Set this option to Yes (default) if you’d like Check It to provide suggestions when the transcript text does not match what the Phoenix ASR engine heard from the audio recording.
Dropped Words - Set this option to Yes (default) if you’d like Check It to provide suggestions when the Phoenix ASR engine heard words that are not present in the text transcript text.
Repeated Words – Set this option to Yes to have Check It offer suggestions for repeated words or phrases up to three words. It may offer suggestions like “the the the” or “I will I will I will” if that's what Phoenix heard.
Set this option to No (default) if you’d like Check It to not provide suggestions when the engine heard words that are repeated such as, “the the the” or “I will I will I will”. If set to No, then Check It may off “the” or “I will” instead.
Note: Check It suggestions will be displayed, if applicable, for untranslates in the transcript regardless of the Scope Area or Compare Types selection.
Check It Options
Use Check It - If this is set to No you will not be able to use the Check It menu item to start Check It.
Show Check It - If this is set to No underlines will not appear in your transcript to indicate words and phrases marked by Check It. You may still use the Check It pane and/or Scan features.
Check It underline color - Select the color you’d like the Check It underlines to have in the transcript. Blue is the default color.
Confidence Threshold – This allows you to specify how “confident” the Phoenix ASR Engine needs to be about a word or phrase before that word or phrase will be used for Check It. For example, if the Confidence Threshold is set to the default of 90, any words or phrases from Phoenix that it is 91% - 100% confident about, but do not match what is in your transcript, will be marked by Check It. In short, the higher the Confidence Threshold the fewer Check It suggestions there is likely to be.
Pop up dialog - When this option is set to Yes (default), double-clicking on a Check It suggestion location in the transcript or on a suggestion in the Check It pane will open the Check It dialog. When this option is set to No, double-clicking on a Check It suggestion in the transcript text won’t open the Check It dialog and double-clicking on a suggestion in the Check It pane will move the cursor to that location in the transcript without opening the Check It dialog. You can still right-click the suggestion in the pane to take action for the suggestion.
Ignore Check It Begin and Ignore Check It End Format Symbols
Check It provides two format symbols that allow you to tell Check It to ignore any text you want ignored in the transcript.
For example, you may have several lines of text that you what Check It to ignore. You can surround that text with the Ignore Check It Begin and Ignore Check It End format symbols.
When you Include (F9) a file, such as a title page, CATalyst will automatically surround that text with the Ignore Check It Begin and Ignore Check It End format symbols.
You may also add Ignore Check It Begin and Ignore Check It End to dictionary definitions.
You may insert the Ignore Check It Begin and Ignore Check It End format symbols into the transcript text using your preferred method for inserting format symbols. For example, pressing F4 twice to bring up the Insert Format Symbols dialog.
Check It Ignore Lists
Check It Ignore lists, give you the ability to tell Check It to stop offering suggestions for words and phrases in the transcript for the following scopes:
Personal – All jobs in the User Folder.
Case – All jobs in the Case Folder.
Job – This job only.
In the Check It dialog, use the Check It Ignore List Scope: drop-down to set the scope. If the Add Old Text to Ignore List – (scope) option is used in the Check It dialog, the word or phrase will be added to the appropriate Check It Ignore List file based on the scope selected. The entry will no longer be underlined by Check It in the transcript(s) and will no longer appear in the Check It pane. The last scope selected is remembered.
An Add Old Text to Ignore List option is available when you right-click on a suggestion in the pane. This gives you the ability to add words and phrases to the appropriate Ignore List.