Direct Audio Record Pane

Written by Justin Sieger
Updated at March 20th, 2024
The Direct Audio Record pane is available for use during realtime when Direct Audio is selected. The Direct Audio Record pane lets you view the current recording status, view how many channels of audio are available, and adjust the recording gains and output volumes.
To open the Direct Audio Record pane, click View, Panes, Direct Audio Record (Alt-v, e, d). The functions available in this pane give you additional control over recording during realtime. You can make adjustments during the realtime job as needed. When using Single Channel audio, all features of the Direct Audio pane will be grayed out.
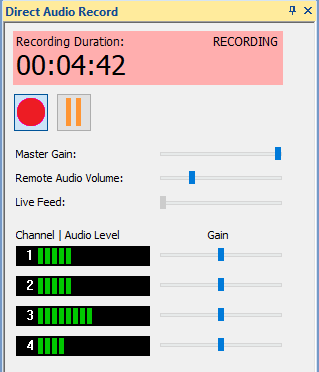
Master Gain
The Master Gain slider will be available when an In-person Input device (mixer or microphone) was selected in Direct Audio Options. This slider allows you to adjust the gain of the In-person input microphone(s). This will adjust the gain for all microphones or input channels available for the In-person recording device. A left adjustment decreases the gain. A right adjustment increases the gain.
NOTE: There is a difference between volume and gain. Volume is how loud the sound is coming out of your speakers or headphones. Gain is how loud the sound is before it comes to your speakers. If gain is set to high, you will experience distorted sound. If gain is set to low, you may not hear the sound at all. General rule of thumb: low gain plus high volume provides a “cleaner” sound. When adjusting gain, adjust the individual channel gain first before adjusting the Master Gain. This allows you much more control with the overall quality of the audio. If you adjust the Master Gain first, then the individual channels, then you may get lower quality sound.
Remote Audio Volume
The Remote Audio Volume slider will be available when a Remote Audio Output device was selected in Direct Audio Options. This slider allows you to adjust the output volume of the speakers, headset, etc., that Remote Audio Output is playing through. A left adjustment decreases the volume. A right adjustment increases the volume. The range is 0% to 100%.
Live Feed Volume
The Live Feed slider will be available when a Live Feed Output device was selected in Direct Audio Options. This slider allows you to adjust the output volume of the speakers, headset, etc., that Live Feed Output is playing through. A left adjustment decreases the volume. A right adjustment increases the volume. The range is 0% to 100%.
Individual Channel Gain
The number of channels that display is based on how many recording channels are available from the In-person Input device selected in Direct Audio Options and if Remote Platform is selected for Remote Audio Input in Direct Audio Options. If Remote Platform is selected, the input volume will be shown as Channel 1 and 2. The remaining channels will be the input volume of each input channel of the In-person recording device. The Gain sliders for each channel can be used to adjust the gain of each individual channel of the recording. A left adjustment decreases the gain. A right adjustment increases the gain. The range is 0% to 100%.
Recording Duration
The Recording Duration section of the pane shows the total time length of the audio recording in Hours:Minutes:Seconds. This includes only the actual time of the recording, it does not include time spent while audio recording was paused. When Audio is being recorded, the background of the Recording Duration shows in a red hue. When Audio is paused, or not recording, the background shows in a yellow hue. The Recording Duration section also shows the words RECORDING when audio is being recorded and PAUSED when audio recording has been paused.
Record Icon
The Record Icon on the Direct Audio Record pane can be used to resume Direct Audio recording when audio recording is paused. You may still use Realtime writer definitions and keyboard map assignments to Resume Audio.
Pause Icon
The Pause Icon on the Direct Audio Record pane can be used to pause Direct Audio recording. You may still use Realtime writer definitions, Direct Audio Options Auto Pause settings, and keyboard map assignments to Pause Audio.
Note: while audio recording is paused, you will continue to hear any Remote Audio output and/or Live Feed output that you may have selected in your Direct Audio Options.
NOTE: If you have Auto-Pause enabled in the Direct Audio options, you do not need to press the Record or Pause icons. Auto-Pause will automatically pause after you have stopped writing for the set number of seconds.