Start a CaseViewNet Cloud Session

Written by Justin Sieger
Updated at February 23rd, 2022
If you have a CaseViewNet license and a Cloud Session Code, you can use CATalyst to send the realtime feed, via CaseViewNet Cloud, to clients anywhere using any device. Clients connect to your feed, over the internet, using the CaseViewNet Windows app, iCVNet, or CaseViewNet Browser Edition. They simply type in your Session Code, password, and their name and click Connect.
If you have just a Cloud Session Code or use a different CAT software, you will need to use the CaseViewNet Cloud Gateway app in order for your client to connect via CaseViewNet Cloud. Our article about Cloud Gateway will help you set it up.
Make sure you and your clients are connected to the internet before starting realtime. The Session Code is not case sensitive and will automatically display in all caps when typed in the Session Code field in Case CATalyst, CaseViewNet and/or iCVNet and CaseViewNet Browser Edition regardless of the state of the Caps Lock key.
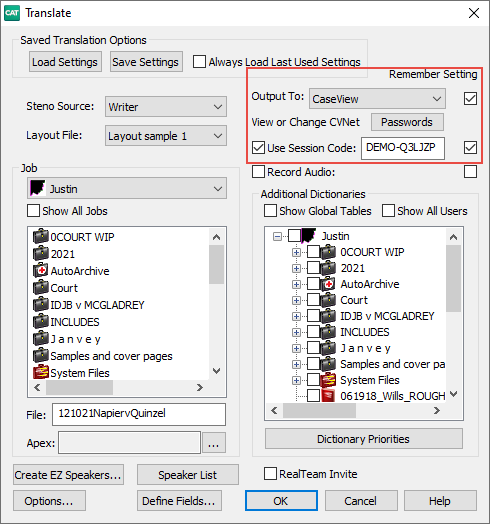
Click Function, Translate/Edit (Alt + u, t) to open Translate.
-
In the Output To field, select CaseView as the output destination. Check the Use Session Code option and type the Session Code in the text box. If the Remember Setting check box is selected, CATalyst will remember the last Session Code used.
-
Click the Passwords button. The CaseView Passwords dialog box displays.
You will see three rows of password settings. In the first row, click inside the Password field and type a new password. The password can be as simple (1234) or complex (Simone40caseview) as you like but must be at least 4 characters long. On the far left side is the Allow Save column. If you want to allow the clients to save and email the transcript, check this box.
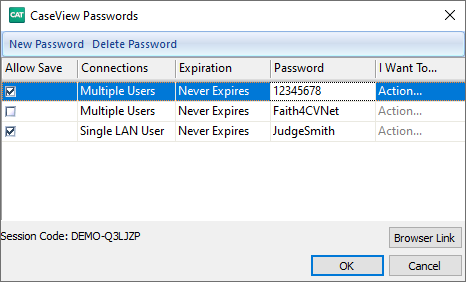
You can have different passwords for different clients. For example, you can give one client the password to save the file and another the password to not save the file.
The Single LAN User row does not work with Session Codes.
-
Click the Options button. The Translate Options dialog box displays.
Click the Output to CaseView tab. Uncheck the option Output over com port.

Click Apply then OK. to return to Translate.
-
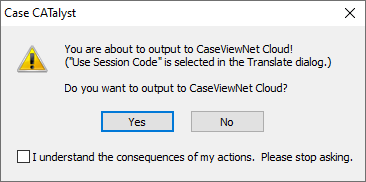
Start a realtime job. A dialog box will a appear confirming you want to output to CaseViewNet Cloud. Select Yes to send realtime to the Cloud. Select No to continue writing realtime but not send to the Cloud.
While doing realtime and outputting to CaseViewNet Cloud, a light  will display on the Status Bar in the lower lower right side.
A green light indicates a successful Cloud connection.
A yellow light indicates the Session Code is attempting to make a connection with the CaseViewNet Cloud.
A red light indicates there is no Cloud connection.